How to Add Ventilation to a Sauna: A Step-by-Step Install Guide
If your sauna feels stuffy after a couple of rounds — heavy air, a foggy head, heat stacked at the ceiling while your feet stay cold — the fix is almost always ventilation. Learning how to add ventilation to a sauna is one of the highest-impact upgrades you can make to a sauna you already own, and on most saunas it's about an hour of work with a drill.
This guide covers why ventilation matters, where the two vents need to go, and the exact steps to install a mechanical ventilation kit. It doubles as the install walkthrough for our Sauna Ventilation Kit — if you've already bought one, skip to the steps.
Why ventilation matters
A sauna is a small, sealed, hot room full of people breathing. Without fresh air moving through it, three things go wrong. Oxygen drops and CO2 builds up — that's the heavy, foggy-headed feeling that pushes you out before you're ready. The air goes stale and stagnant, especially after the second or third round. And heat stratifies badly, pooling at the ceiling while the air down at foot level stays cool and used-up.
Most saunas — kits, prefabs, and even custom builds — rely on passive vents: two holes and the hope that air moves on its own. Usually it doesn't move enough. Passive ventilation depends on temperature difference and wind, and on a still day a passive setup barely exchanges any air. That's why so many saunas feel stuffy despite technically having vents.
There's a moisture angle too. Stagnant, humid air trapped in the room and wall cavities is what grows mold and rots wood over time. Moving air through the room during and after sessions keeps surfaces drier and the structure lasts longer — more on that in our guide to preventing mold in a sauna.
Adding a small mechanical fan solves all of it. It actively pulls stale air out and draws fresh, heated air down to where you actually sit and breathe, instead of leaving it to chance.
Where the two vents go
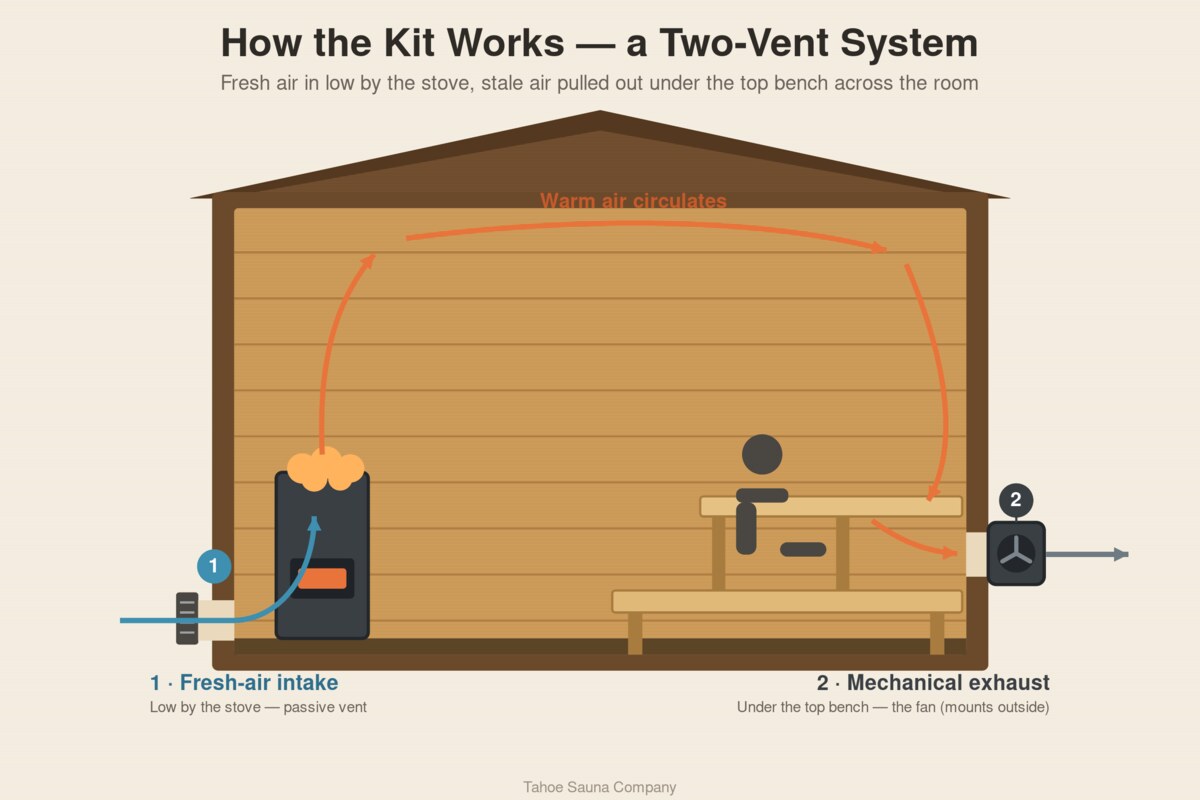
Ventilation is a two-vent system, and placement is the whole game — a vent in the wrong spot does almost nothing. Here's the layout that works:
The intake is a passive vent on the heater wall, just above the stove — about 12 inches above the top of the stove and 12 inches to the right of it, beside the heater rather than directly over it. Fresh air comes in there and gets grabbed by the heater's rising convection plume, so it's warmed and mixed into the hot air instead of sinking cold across the floor or pooling at your feet.
The exhaust is the mechanical vent — the fan. It goes on the opposite wall, below the foot bench (the lower bench). That low, under-the-bench placement is the key: the fan pulls the mixed, heated air down through the bench zone where you actually sit and breathe, and takes the CO2-heavy air out at the lowest point in the room — without dumping the hot, fresh steam at the ceiling.
Fresh air in above the stove, used air out below the foot bench on the far wall, in a steady loop across the whole room. If you want the full reasoning and diagrams for every heater position, our sauna ventilation design guide goes deep on placement and sizing, and mechanical vs. natural ventilation explains why a fan beats passive airflow.
Trusted by homeowners across Tahoe and beyond
What's in the kit
The install is simple because the hard part — sizing and matching the fan, ducting, and fittings — is already done in the Sauna Ventilation Kit. Everything you need arrives in one box, pre-matched and mostly pre-assembled. The photo below is your reference for the whole job: every part is numbered, and the steps that follow call out parts by these numbers, so keep it handy as you work.
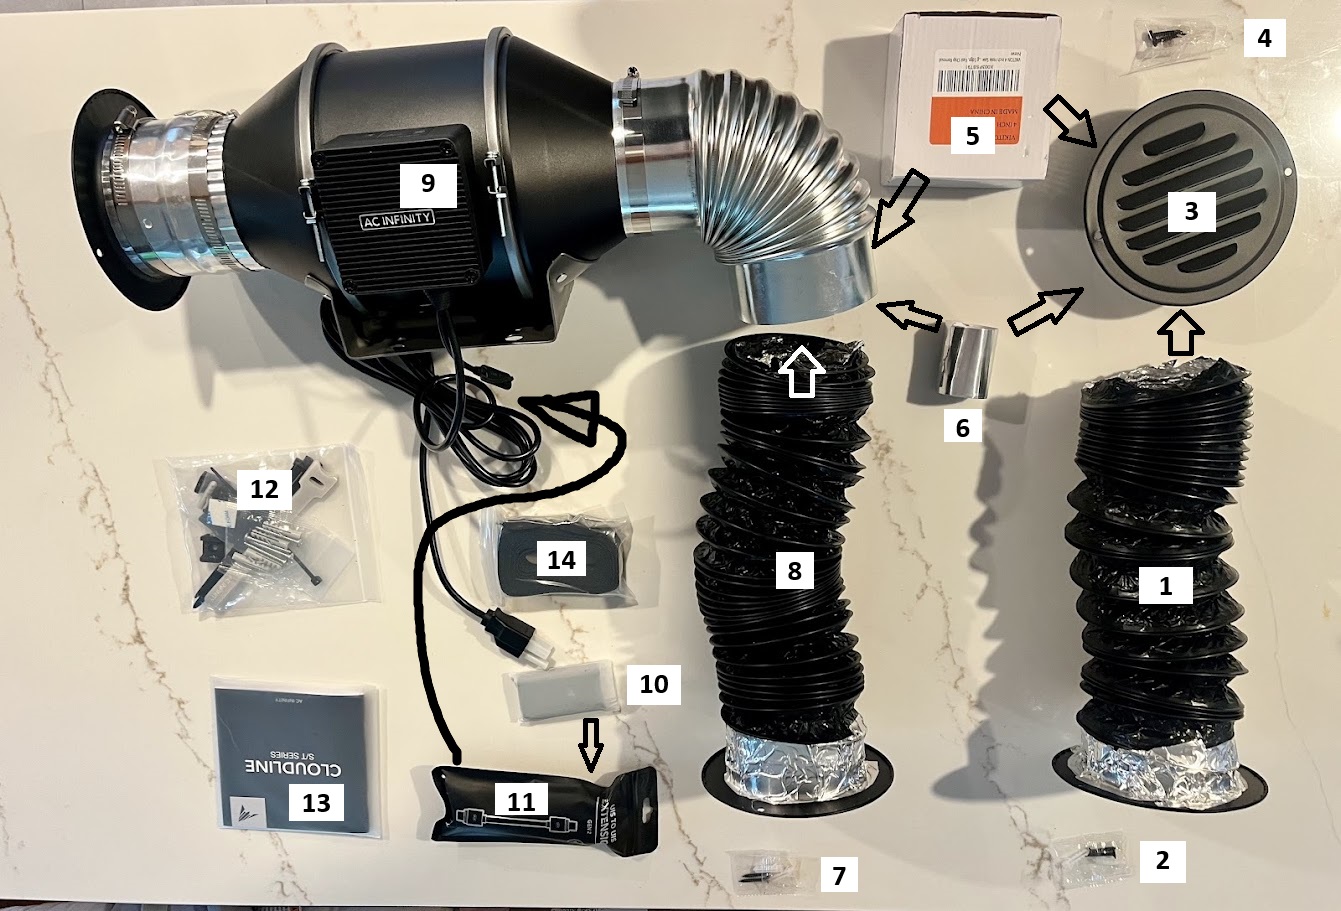
Here's what each number is:
- Insulated duct run — a length of insulated flex duct, pre-sealed to a wall collar with foil tape (the exhaust run).
- Screws — mounting screws for the vent hardware.
- Louvered vent cover — the finish cover that caps a vent opening.
- Screws — mounting screws for the vent hardware.
- 4-inch hole saw — cuts both vent openings; the only power tool you supply is the drill it chucks into.
- Aluminum coupler — joins two duct sections together.
- Screws — mounting screws for the vent hardware.
- Insulated duct run — the second length of insulated flex duct, also pre-sealed to a wall collar (the intake run).
- Inline exhaust fan — the quiet 4-inch AC Infinity fan, pre-fitted with a 90° galvanized elbow and coupler. This is the heart of the kit and mounts outside.
- Fan speed controller — the 10-speed controller that sets airflow.
- Controller extension cable — extends the controller lead so it can reach a comfortable spot inside the sauna while the fan stays outside.
- Mounting hardware — bracket, screws, zip ties, and corner mounts for securing the fan.
- Fan manual — the AC Infinity CLOUDLINE S/T Series manual for the fan and controller.
- Fastening strap — velcro strap for tidying the cable run.
The only tool you supply is a drill. If you're sourcing parts yourself instead, you'll need a comparable 4-inch inline duct fan, ducting, a 4-inch hole saw, foil tape, and vent covers — but getting the fan size and airflow right for a sauna is exactly what the kit takes off your plate.
How to install the ventilation kit, step by step
The whole job is about an hour. Nothing here requires a contractor or an electrician. The key work is cutting two clean openings and mounting the fan outside. Refer back to the numbered photo above as you go — each step points to the parts you need by number.
1. Mark your two vent locations. Using the placement above (intake about 12 inches above and 12 inches to the right of the stove, exhaust on the opposite wall below the foot bench), mark the center of each hole on the interior wall. Before you cut the exhaust opening, confirm there's clear space directly outside for the exhaust fan (9) to mount.
2. Drill through the wall. Chuck the 4-inch hole saw (5) into your drill and cut each opening. Start the cut from the inside so the interior face is clean:
Then finish the cut from the outside so you don't blow out the exterior siding:
Once you're through, pop the wood core out of the hole saw (5) and set it aside.
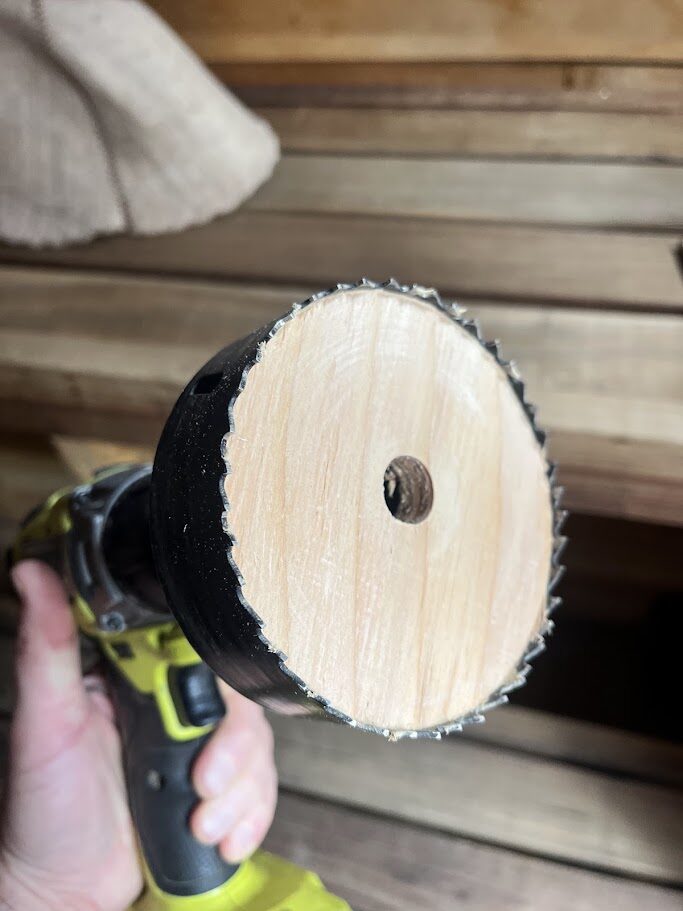
3. Clear the insulation in the opening. If your sauna walls are insulated, push the insulation aside inside the hole so the duct has a clean, unobstructed path through the wall.
You want to end up with a clean opening straight through the wall, like this:
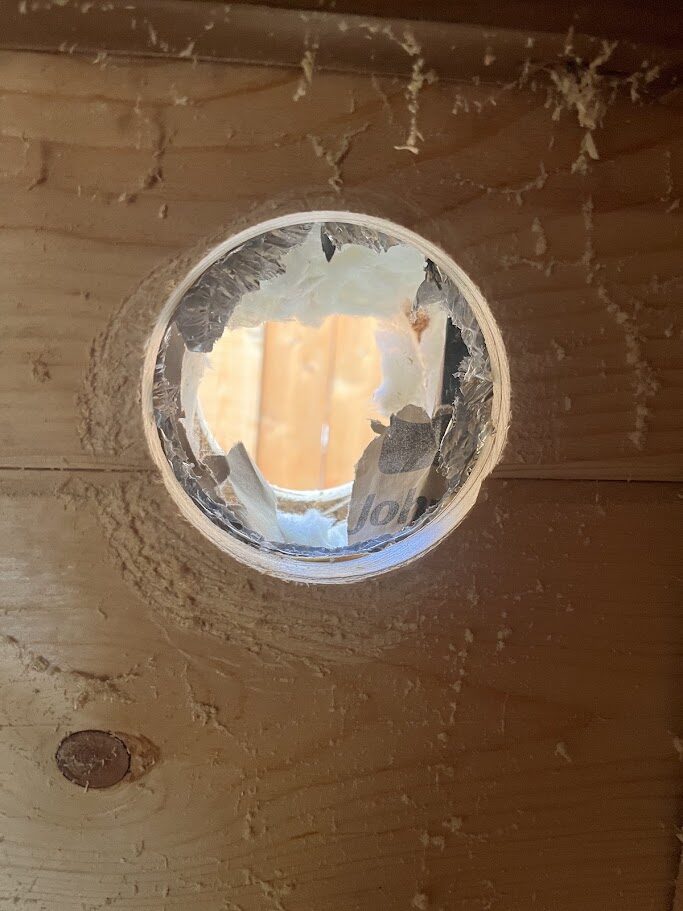
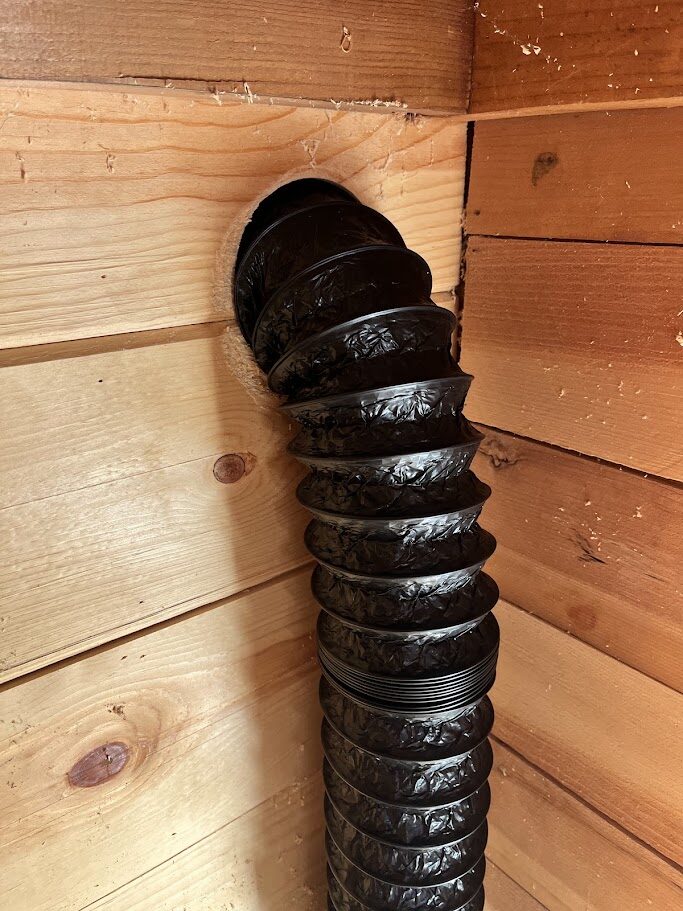
4. Run the ducting through the wall. Feed an insulated duct run (1) through the exhaust opening. Its wall collar is already sealed with foil tape; if you need to join a second length to reach the fan, connect it with the aluminum coupler (6). If the run comes up short, the second duct (8) and coupler (6) extend it.
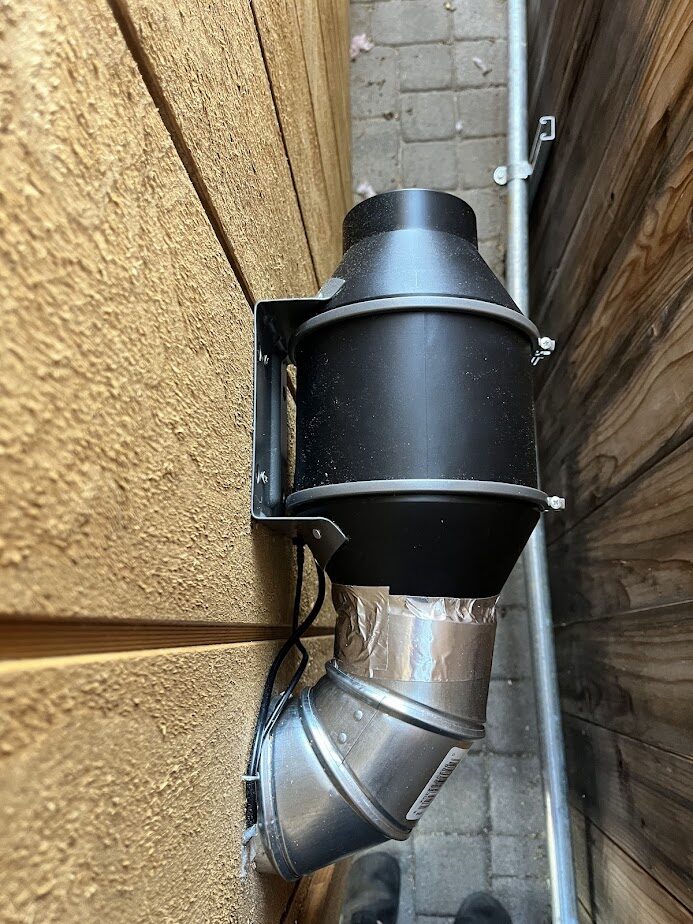
5. Mount the exhaust fan outside. On the exterior wall, mount the fan (9) using the included mounting hardware (12), and connect its pre-fitted elbow and coupler to the duct run (1). Mounting the fan outside keeps it completely clear of the sauna's heat, which is exactly where you want an electric fan.
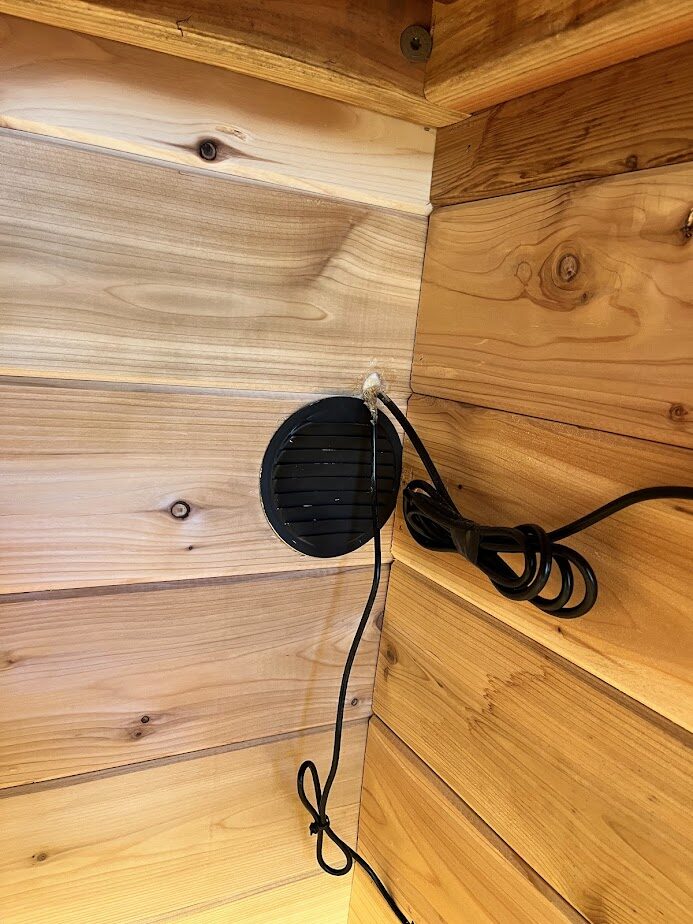
6. Fit the interior vent cover. Back inside, set a louvered vent cover (3) over the exhaust opening and fix it with the screws (2, 4, or 7) for a clean finish. Do the same for the passive intake vent above and beside the stove — that one gets no fan, just the fresh-air inlet (an adjustable cover is a nice touch so you can dial it in).
7. Wire up the controller. Plug the fan's lead into the speed controller (10), using the extension cable (11) to route the controller to a spot you can reach inside the sauna. Tidy the cable run with the velcro strap (14) — the manual (13) covers the controller's settings if you want to dial in a temperature trigger.
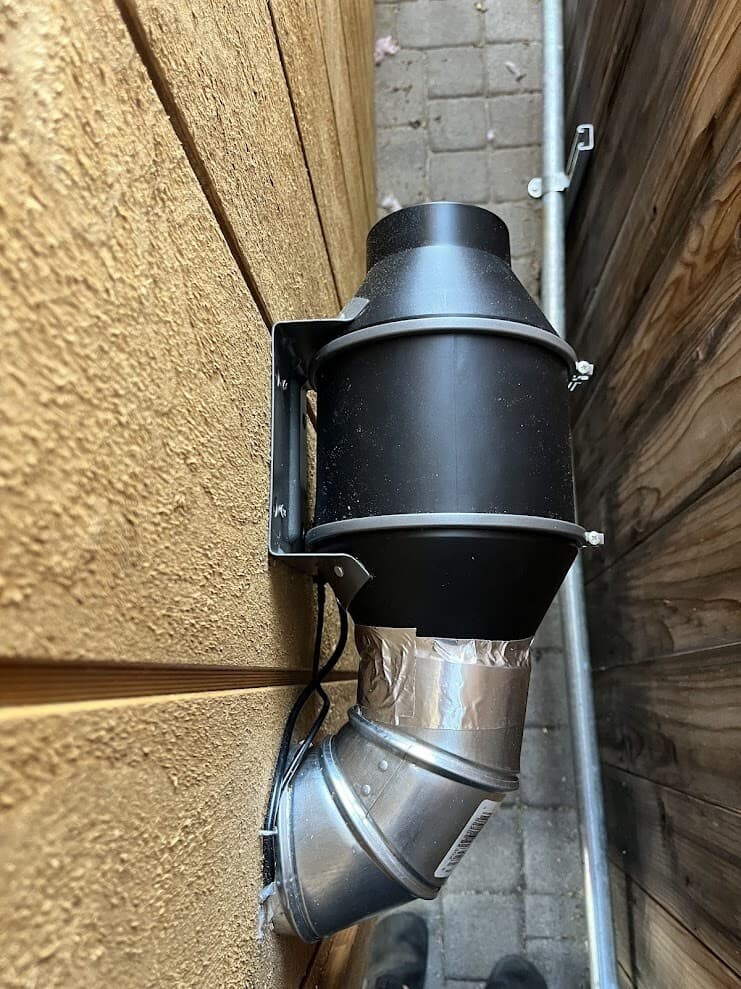
8. Weatherproof the exterior fan. The fan (9) is electric, so out in the weather it needs protection from rain, snow, and sun. Enclose the exterior fan and ducting — the Wood Cover version of the kit adds a hand-built, stainable housing that does this in one piece, or you can build your own cover.
9. Power it up and test. Plug the fan into a nearby outlet or extension cord and you're running the same day, or hardwire it for a cleaner finish. Turn the controller (10) up and check that air is moving — you should feel the intake pulling fresh air in above the stove. Run a full session and you'll notice the difference immediately: clearer air, a clearer head, and heat that feels more even from your feet to your head.
Frequently Asked Questions
Can I add ventilation to a sauna that's already built?
Yes — that's exactly what a retrofit kit is for. You don't need to open up walls or rebuild anything. Adding ventilation to an existing sauna means drilling two 4-inch holes (intake and exhaust), mounting a passive intake and a mechanical exhaust fan, and powering the fan. It works on a barrel sauna, a prefab kit, a cabin, or a custom build, indoor or outdoor.
Do I need an electrician to add a sauna fan?
No. The fan runs on a standard plug, so you can run it off a nearby outlet or an extension cord and use it the same day. You can hardwire it for a cleaner finish if you prefer, but it isn't required. Because the fan mounts outside the hot zone, the cord and controller stay cool.
How long does it take to install sauna ventilation?
About an hour with the pre-assembled kit, because the fan and ducting arrive as one sealed unit. You drill two holes with the included saw, mount the intake and the exhaust fan, seal the joints, and plug it in. The only tool you supply is a drill.
Does the exhaust fan go inside or outside the sauna?
Outside. The fan mounts on the exterior wall so it stays completely clear of the sauna's heat — an electric fan lasts far longer out of the hot zone. The ducting runs through the wall to the fan, and only the vent opening is visible on the inside. Because it's outside in the weather, the fan needs a cover to protect it from rain, snow, and sun.
Where exactly should the vents go?
The intake goes on the heater wall about 12 inches above the top of the stove and 12 inches to the right of it, so incoming air is caught by the heater's rising plume and mixed with the hot air. The exhaust goes on the opposite wall, below the foot bench — that pulls the mixed air down through the bench zone where people sit and breathe and out at the lowest point. Getting this placement right is the difference between ventilation that works and vents that do nothing. Our ventilation design guide covers placement for every heater position.
Next steps
Adding ventilation is one of the few sauna upgrades that changes how the room feels immediately — better air, a clearer head, and even heat, in about an hour of work. The Sauna Ventilation Kit gives you the matched fan, ducting, hole saw, and placement guide in one box, so there's no sourcing parts or guessing at fan size. If you're still building your sauna, we'll design the ventilation in from the start alongside the heater and benches — see our custom sauna design service.