How to Waterproof a Sauna Floor: EPDM Liner, Sloped Plywood, and a Drain by the Door
If you're figuring out how to waterproof a sauna floor, the simplest system we've found is one continuous EPDM rubber liner over a plywood floor that slopes 1″ toward a drain by the door, with removable cedar duckboard on top. Water that gets through the duckboard runs down the liner and out the drain. Nothing under the liner ever gets wet.
It's cheaper and easier than tile, and much easier to keep clean. Lift the duckboard, hose or wipe the liner, and put the duckboard back. This is the floor we're building on a 6′ × 8′ outdoor sauna on a covered deck, and the method works for any size room.
Below is the whole build: materials, the slope, the liner, the drain, the walls, and the duckboard, with a diagram for each.
The floor system at a glance
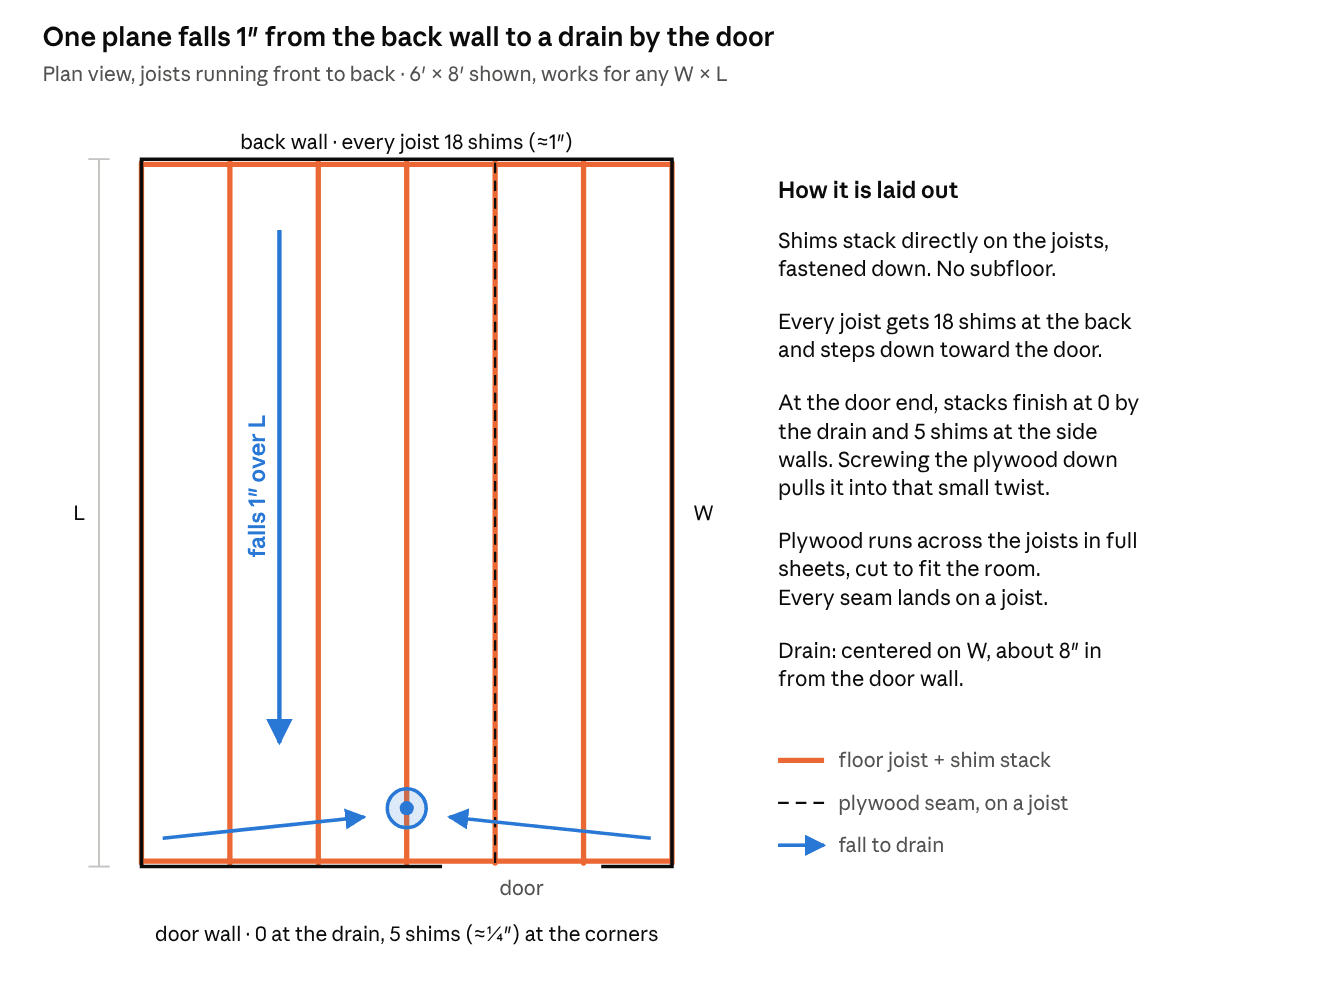
There's no subfloor. Drywall shims fasten straight onto the floor joists, stacked 18 layers deep at the back wall and tapering to nothing at the drain. 19/32″ plywood goes on top of the shims and becomes one sloping plane.
The EPDM liner covers the whole floor in one piece and turns up 12″ on every wall. It's stuck to the plywood with double-sided butyl tape and clamped into an Oatey shower drain. Cedar duckboard panels sit on top.
Rigid foam between the joists is optional. Over an open deck it makes a noticeable difference in how warm the floor feels.
If you're still deciding whether your sauna needs a drain at all, start with our post on whether you need a sauna floor drain. This post assumes you want one.
Materials for a waterproof sauna floor
These are the quantities for a 6′ × 8′ floor, at prices we checked in October 2026.
| Item | Used for | Qty | Total |
|---|---|---|---|
| Lifeguard EPDM pond liner, 10′ × 10′, 45 mil | The waterproof layer, in one piece | 1 | $118.00 |
| Oatey PVC shower drain with clamp ring (423132) | Drain; the liner clamps between base and ring | 1 | $12.51 |
| Oatey 4-1/4″ Snap-Tite strainer | Grate that snaps into the drain | 1 | $17.63 |
| GE Silicone 2, clear | Bedding bead under the liner at the drain | 1 | $10.98 |
| Double-sided butyl seam tape, 3″ × 30′ | Sticks the liner to the plywood | 1 | $49.99 |
| Arrow T50 stainless staples | Top edge of the liner turn-up | 1 | $14.97 |
| Grip-Rite drywall shims, 0.055″ thick | Stacked on the joists to set the slope | 2 | $31.98 |
| 19/32″ sheathing plywood, 4×8 | The floor itself | 2 | $73.16 |
| Cedar board, 3/4″ × 4″ × 8′ | Duckboard slats and cleats | 32 | $410.56 |
| Total | $739.78 |
You'll also need wood glue for the shim layers, screws for the plywood, 2× blocking under the drain, foil tape, and the 2″ PVC drain line. Add rigid foam if you're insulating between the joists. For the rest of the sauna, our sauna materials estimator covers framing, insulation and paneling.
Trusted by homeowners across Tahoe and beyond
How to slope a sauna floor toward the door
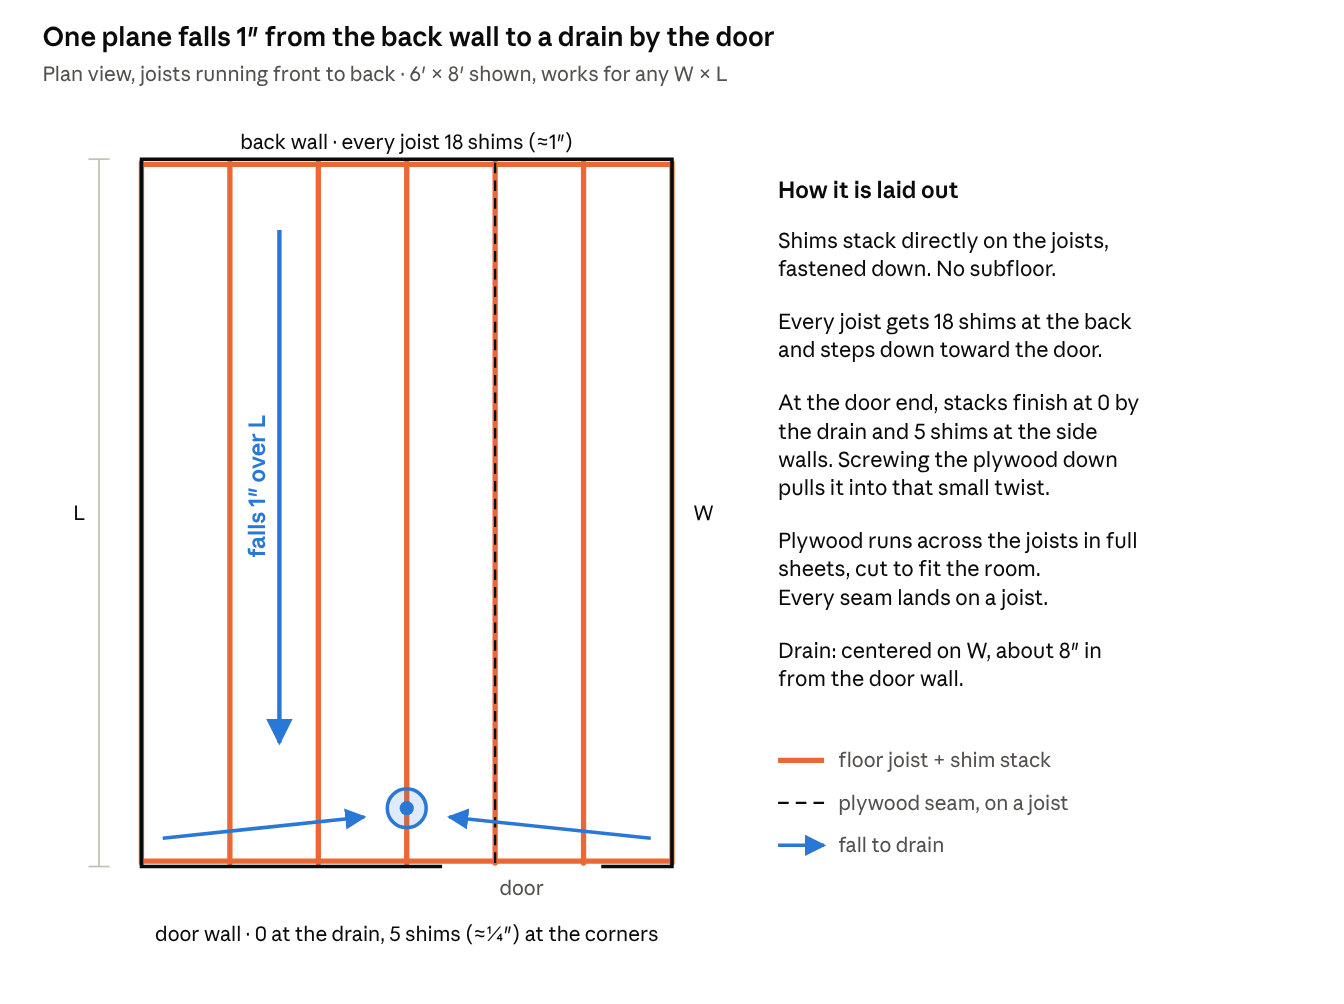
The floor falls 1″ from the back wall to a drain centered on the door wall, about 8″ in from it. One flat plane would carry water to the door wall but leave it sitting in the two front corners. So the front corners sit ¼″ higher than the drain, and water there runs sideways into it. Screwing the plywood down onto the shims pulls it into that small twist without any cutting.
Lay the plywood across the joists in full sheets, cut to fit, and land every seam on a joist.
Building the shim stacks
The drywall shims are 0.055″ thick, so 18 layers gets you to about 1″. Glue each layer and fasten it with staples, brad nails or screws.
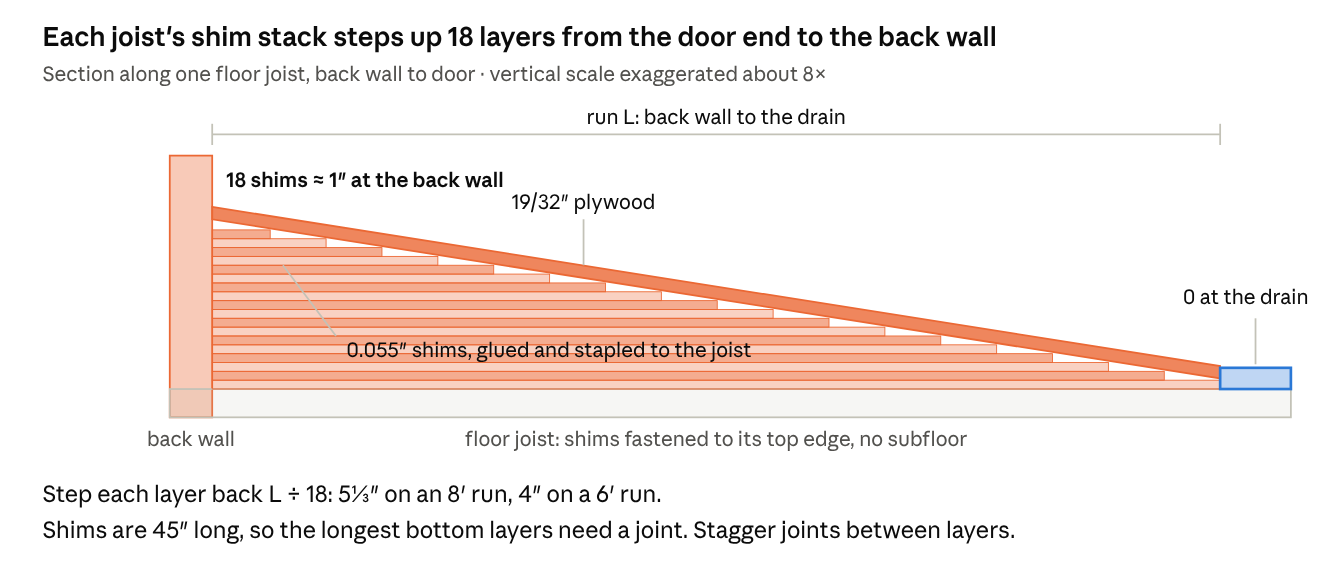
If the joists run front to back, step each layer back by the run divided by 18: about 5⅓″ on an 8′ run, or 4″ on a 6′ run. If the joists run side to side, each joist gets an even stack instead, with 18 shims on the back joist and fewer on each one toward the door.
The shims are 45″ long, so the longest bottom layers need a joint. Stagger the joints between layers, and check every stack with a straightedge from the back wall to the door before the plywood goes on.
| Floor size, joists front to back | Joists at 16″ o.c. | Shims needed, with 15% waste |
|---|---|---|
| 5′ × 6′ | 5 | about 130 |
| 6′ × 8′ | 6 | about 195 |
| 8′ × 8′ | 7 | about 230 |
Why the plywood is 19/32″
With no subfloor, the plywood is the floor. APA's minimum for a single-layer floor on joists 16″ o.c. is a 19/32″ rated panel, and joists at 24″ o.c. need 23/32″ (APA floor installation guide). Thin 3/8″ sheathing isn't rated for floors at all and will flex between joists.
Waterproofing the sauna floor with an EPDM liner
Cut the liner to the floor size plus 24″ each way. That gives a 12″ turn-up on every wall from one piece with no seams. A 10′ × 10′ liner covers floors up to 8′ × 8′.
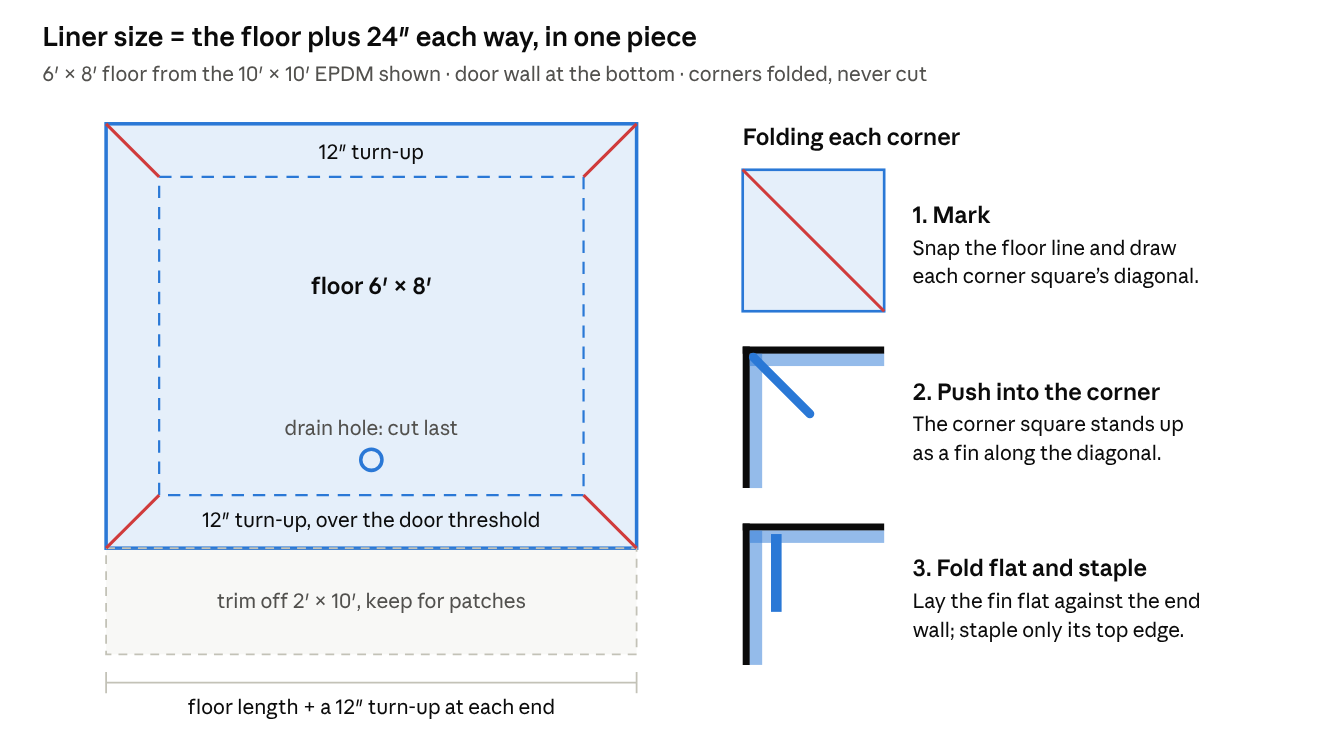
Never cut the corners. Push the liner into each corner so the extra stands up as a fin along the diagonal, then fold the fin flat against the end wall and staple only its top edge. It's the same fold used on a PVC shower pan liner.
Dry-fit the liner first. Then fold back half of it, lay butyl tape on the plywood, peel the backing, and roll the liner down. Repeat for the other half. On a 6′ × 8′, one strip around the perimeter, 2″ in from the walls, plus a ring around the drain uses about 28′ of the 30′ roll. A second roll laid in strips 2′ apart bonds the open floor as well.
The wall detail
The liner turns 12″ up the studs and is stapled only in its top inch, into 2× blocking. The foil vapor barrier comes down over the face of the liner, so any water running down the wall lands on the liner, not behind it. Paneling stops ½″ above the floor. Our post on how to frame a sauna room covers the rest of the wall.
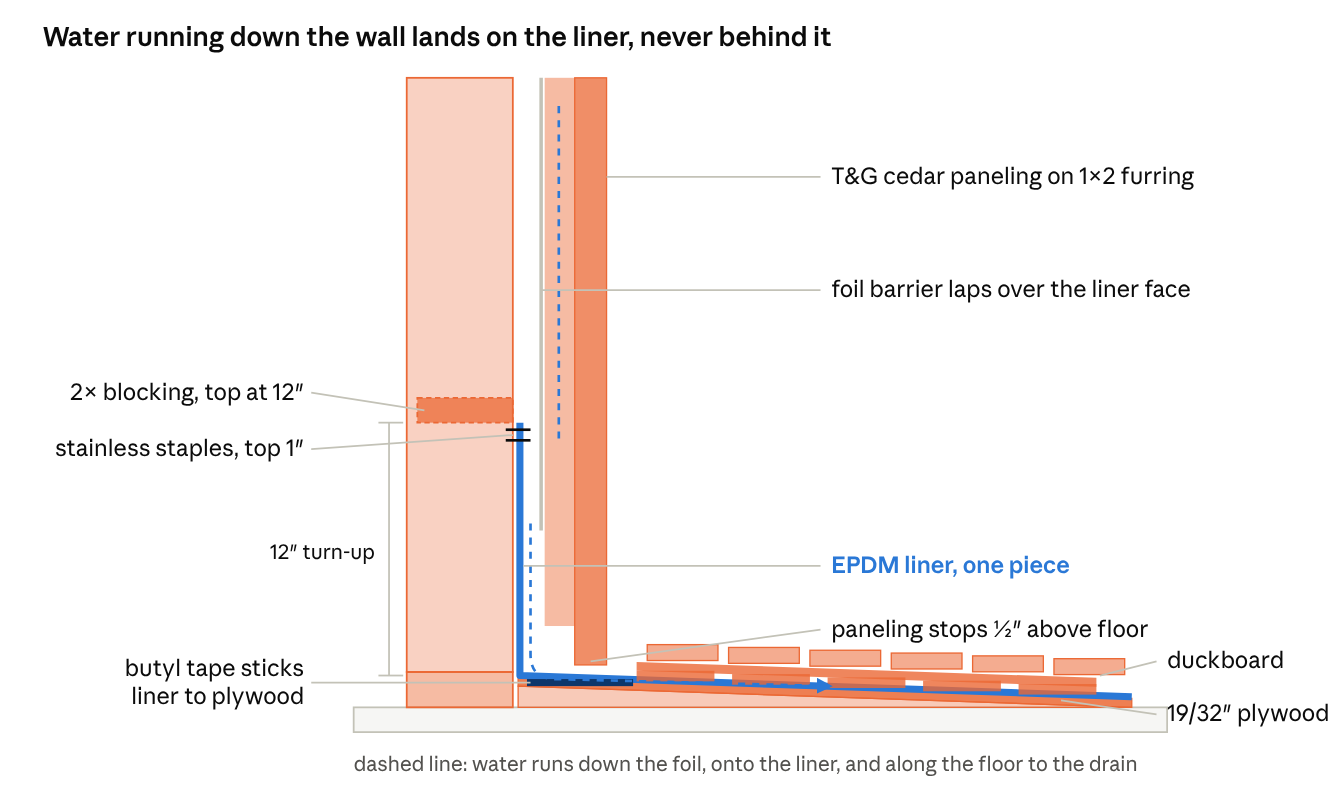
At the door, there's no wall to turn up. Wrap the liner up and over a solid threshold curb at least 1½″ high. The whole floor drains toward the door, so that curb is what keeps the water in.
Installing the drain
The Oatey drain base sits on 2× blocking nailed between the joists, set so its flange finishes flush with the top of the plywood. The 45 mil EPDM is sandwiched between the base and its clamp ring, bedded on a bead of silicone.
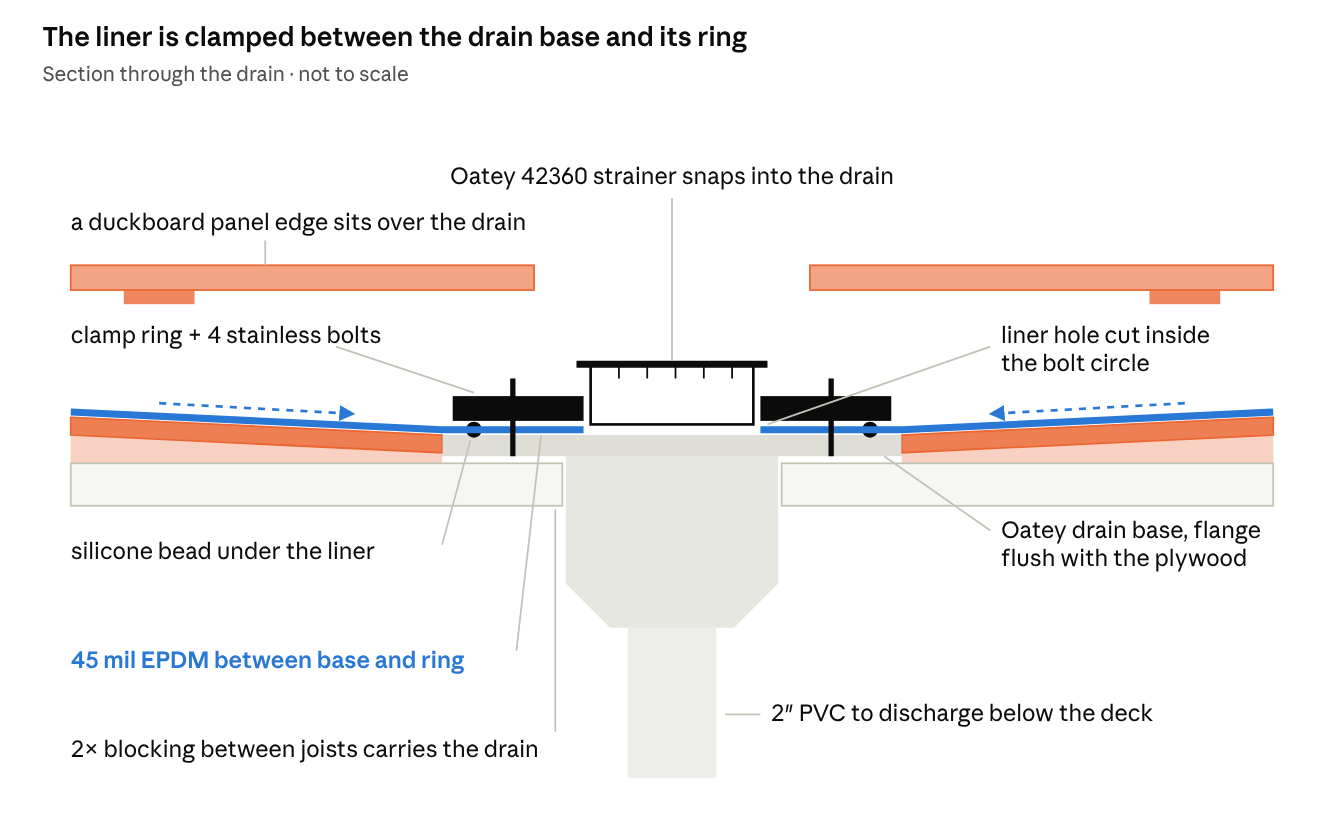
Press the liner into the silicone and punch the bolt holes. Cut the drain hole inside the bolt circle, then tighten the four bolts a little at a time in a cross pattern until the silicone squeezes out evenly. Silicone won't damage EPDM, but it bonds to it weakly, so the clamp's squeeze is what makes this joint watertight.
Before anything gets closed in, flood test it. Plug the drain pipe and fill to about 1″ deep at the drain, below the top of the curb. Mark the waterline and wait 24 hours. If the line drops or anything drips under the deck, fix it now.
Duckboard on top
The duckboard is what you actually walk on. For a 6′ × 8′, 32 cedar boards make four 47½″ × 35½″ panels, each with nine slats on three cleats, with 8 boards left over.
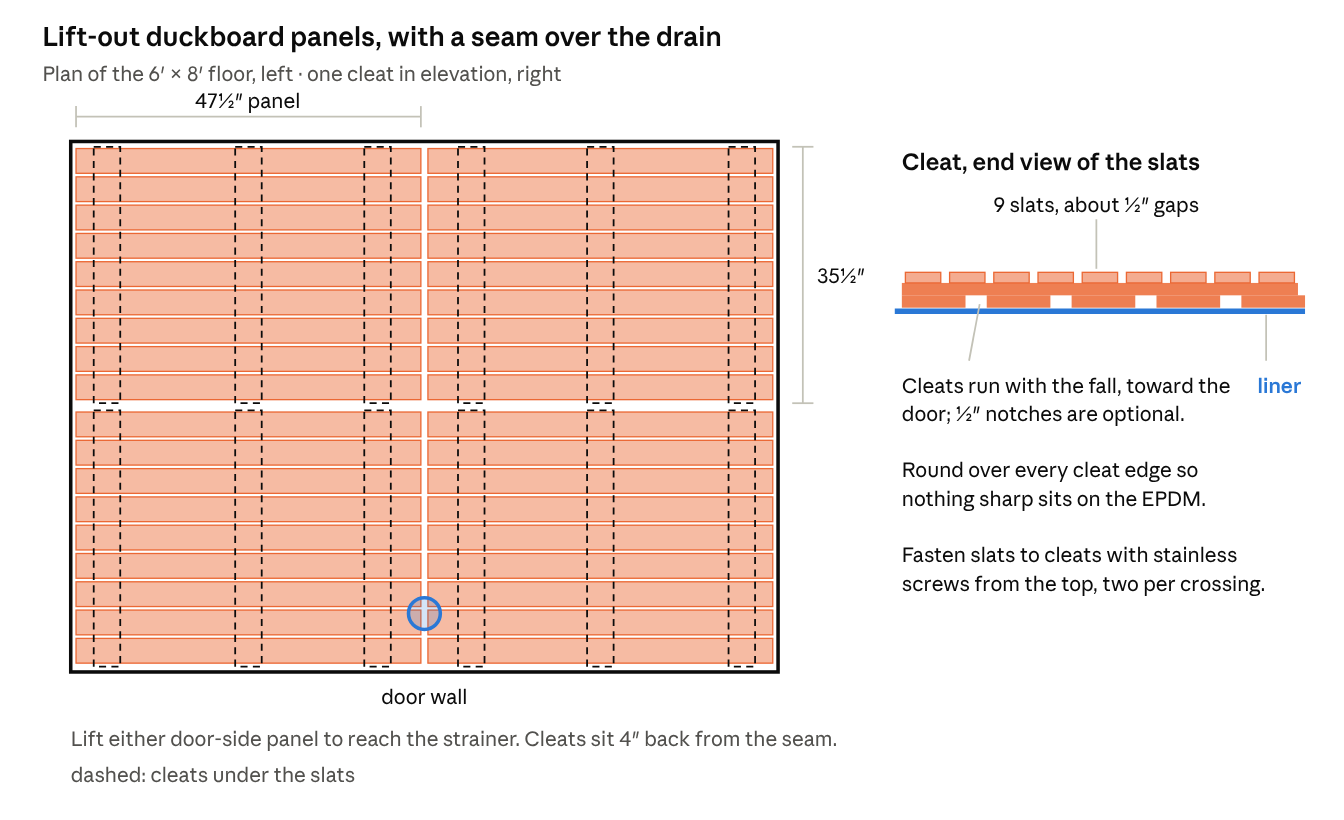
Run the cleats toward the door, with the fall, so water passes between them. Put a panel seam over the drain so you can lift one panel to reach the strainer. Round over every cleat edge so nothing sharp sits on the liner, and use stainless screws so the cedar doesn't stain around them. For upkeep, see how to clean a sauna.
Frequently Asked Questions
What is the best way to waterproof a sauna floor?
For a wood-framed sauna, one continuous EPDM liner over a sloped plywood floor is the simplest reliable option. It has no grout or seams to fail, it costs a fraction of tile, and with lift-out duckboard on top it's easy to clean. Tile over a waterproofing membrane works too, but it's more labor and needs a stiffer floor.
Can you put EPDM in a sauna?
Yes. The floor is the coolest part of a sauna, usually around 85–105°F, well within what EPDM handles. Keep the liner out of any area the heater manual says must be noncombustible, and check your heater's floor clearances before you lay it.
How much slope does a sauna floor need?
We use 1″ of total fall from the back wall to the drain, with the front corners ¼″ above the drain so water doesn't sit there. That's about ⅛–3/16″ per foot on typical sauna sizes, which is plenty under duckboard, where the floor only sees drips and löyly runoff, not shower volumes.
Do I need a subfloor under a sauna floor liner?
Not with this method, as long as the plywood is rated as a single-layer floor for your joist spacing. That's 19/32″ at 16″ o.c. and 23/32″ at 24″ o.c. The shims fasten to the joists, and the plywood over them is the floor.
Next steps
We put this together as a full construction guide with every detail drawing and the materials list. If you're planning a sauna and want the floor, drain, ventilation and heater worked out before you build, our remote sauna design service covers it, or book a design consultation.