Sauna Doctor
Sauna maintenance and renovation for the sauna you already have. If yours feels tired — stale air, gray benches, crumbling rocks, or a layout that never quite worked — most of it is fixable, and a lot of it you can do yourself. Here's what to check, what to fix, and when it's worth bringing in someone who designs saunas for a living.

This is for people who already own a sauna — a backyard build, an indoor or basement room, a barrel or prefab kit, or a gym sauna that's seen a lot of use. Saunas are simple, but they take a beating: heat, sweat, and moisture work on the wood and the heater every session. The good news is that almost nothing that goes wrong requires tearing it down. Maintenance keeps a good sauna good. Renovation fixes the things that were never right — usually ventilation, benches, or drainage.
Sauna Maintenance — Keeping a Good Sauna Good
Maintenance is the stuff you can do yourself with a towel, a brush, and an hour every few months. Do it and a sauna lasts decades. Skip it and the wood goes gray, the heater struggles, and the room starts to smell.
Cleaning
The single most important habit isn't scrubbing — it's drying. After every session, leave the door open and let the room air out completely. Trapped moisture is what rots sauna wood and grows mildew, not the heat. Wipe the benches down after you use them so sweat doesn't soak into the grain.
Every month or two, do a deeper clean: scrub the benches, backrests, and floor with warm water and a little mild soap or a dedicated sauna cleaner, then rinse and let it dry fully before you close it up. If the benches have gotten dingy or stained, a light sanding brings the fresh wood back — you don't need to replace anything. Don't use bleach or harsh chemicals; the wood holds the smell and you'll breathe it next session.
Caring for the Wood
The big rule: don't seal or varnish the interior wood. A sealed surface traps heat, gets too hot to sit on, and eventually peels. Bare cedar, hemlock, or aspen is supposed to breathe — that's how it handles the moisture. If you want, you can treat the benches with a food-safe paraffin sauna oil, which helps them shed sweat and water, but it's optional, not required.
The exterior is the opposite story. Outdoor siding takes rain, snow, and UV, and a good stain or sealer every couple of years is what keeps it from graying and checking. If your outdoor sauna is looking weathered, that's usually a refinish, not a rebuild.
Restacking and Replacing the Rocks
People forget the rocks are a consumable. They crack from the constant heating and cooling, and as they break down the small pieces pack together and choke the airflow up through the heater. A heater that can't breathe runs hotter than it should and wears out faster.
Once a year, pull all the rocks out, toss anything cracked or crumbling, rinse the dust off the rest, and restack them loosely so air moves through — bigger rocks on the bottom, smaller toward the top, not jammed in tight. Plan on fully replacing the set every couple of years. Use real sauna stones (peridotite or olivine), not rocks from the yard or creek, which can hold water and crack or pop when they heat up.
The Heater — When the Sauna Won't Get Hot
The most common complaint we hear about an older sauna is simple: it doesn't get hot like it used to, or it never gets all the way up to temperature. A good traditional sauna should hit 170–195°F. If yours stalls out at 140 or 150 and takes forever to get there, something's wrong, and it's usually the heater.
On an electric heater, the usual culprit is a burned-out heating element. Most heaters have three or more elements, and they don't all fail at once — when one goes, the heater still turns on and still glows, so it looks fine, but it's only putting out a fraction of its rated power and it can't reach temperature. Elements are a wear item; they thin out and crack over years of heating and cooling, and they go faster if the rocks are packed too tight and choking the airflow. The good news is elements are replaceable — you don't need a whole new heater. You match the wattage and voltage to your unit, swap the bad one (or do the whole set if the heater's old), and you're back to full output.
The other common failure is the thermostat or the temperature sensor. If the sauna shuts off way too early, never kicks back on, or runs wildly hot and cold, the thermostat or the sensor that feeds it is usually the problem — a sensor drifts out of calibration or a contactor wears out, and the heater stops trusting the room temperature. On a standalone controller this is a straightforward part swap; on a built-in unit it's a bit more involved. Either way it's a repair, not a teardown.
Not every "won't get hot" problem is the heater, though. If the elements and thermostat check out, the next things to look at are whether the heater was ever sized right for the room (an undersized heater never wins — figure roughly 1 kW per 45–50 cubic feet of sauna), and whether the room is losing the heat through failed insulation, a missing or torn vapor barrier, or a leaky door and single-pane glass. A sauna that used to heat fine and slowly got weaker is almost always a dying element. A sauna that never heated well from day one is usually undersized or under-insulated. Tell us which one yours is and we can point you at the fix.
Sauna Renovation — Fixing What Was Never Right
Renovation is the next level up: changing something about how the sauna is built, not just keeping it clean. These are the upgrades we get asked about most, roughly in the order of how much difference they make.
Adding Ventilation
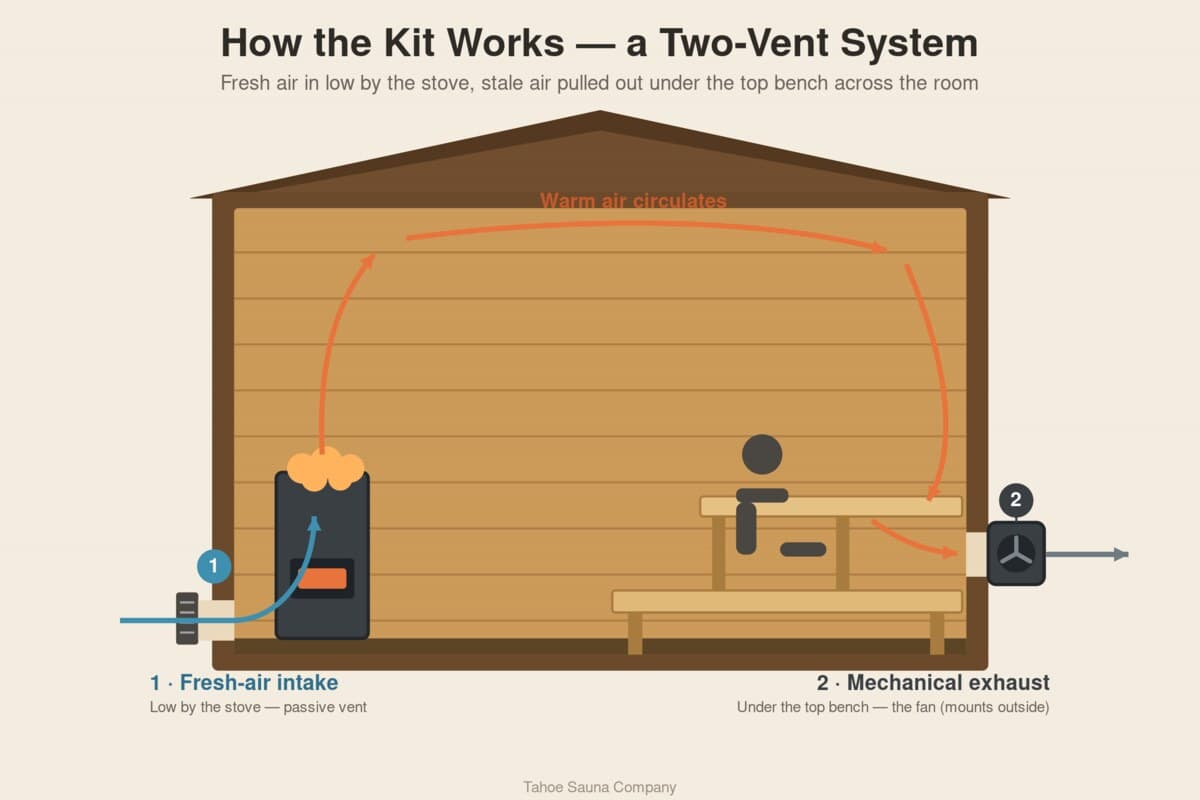
This is the big one. Poor ventilation is the most common thing wrong with existing saunas, and it's why a room feels stuffy and stale after a couple rounds, why your head goes foggy, and why all the heat sits at the ceiling while your feet stay cold. Most kits and a lot of custom builds rely on two passive holes and hope the air moves on its own. It usually doesn't — not enough.
The fix is a proper two-vent system: fresh air in low by the stove, used air pulled out at bench height on the opposite wall. You can add it to almost any sauna without rebuilding. That's exactly what our Sauna Ventilation Kit does — it's a pre-assembled intake and powered exhaust you install with a drill in about an hour. If you only do one thing to an older sauna, do this.
The Sauna Ventilation Kit — a complete intake + exhaust system for any sauna.
A complete intake + exhaust system for any sauna — kit, prefab, or custom. Arrives pre-assembled: drill two holes, mount it, and plug it in. Cuts CO2, clears the haze, and evens out the heat. From $395, with free shipping.
Bigger or Better Benches
A lot of older saunas — and most kits — have benches that are too narrow and too low. The goal is to sit with your feet at or above the level of the stove, so the heat is even from head to toe, and to have a top bench wide enough to actually lie down. We aim for benches at least 24 inches wide and an upper bench high enough that your feet clear the top of the heater.
Rebuilding benches is one of the higher-impact renovations because it changes how the sauna actually feels to sit in. It's usually straightforward — new framing and fresh clear cedar or aspen for the tops — and it doesn't touch the shell of the building.
Adding a Floor Drain
If your sauna floor is wood or sealed slab with nowhere for water to go, washing it down and managing sweat and löyly water is a chore. Adding a tiled floor with a drain makes the room far easier to keep clean and dry — which, going back to the top of this page, is what makes a sauna last. This is a bigger job since it involves the floor, but it's worth it on a sauna you use hard or a commercial setup.
Other Renovations
Plenty of other things come up: upgrading or resizing a heater that was never right for the room, adding or replacing insulation and a proper vapor barrier on a sauna that loses heat, swapping a leaky door or single-pane glass, adding a window or a backrest, or refinishing a tired interior with fresh paneling. Some of these are an afternoon; some are real projects. The honest answer is usually "it depends" — on what's behind the walls and how the sauna was built in the first place. That's where it helps to have someone look at it.
Not Sure What Yours Needs? Get an Assessment
We design and build saunas for a living, and we're happy to look at yours. Send a few photos and tell us what's going on — stale air, tired wood, a layout that never worked, whatever it is — and we'll tell you what we'd do, what you can handle yourself, and what's worth bringing in help for. Starting the conversation is free. If it turns into a full remote design or renovation plan, we'll quote that up front.
Tell us what's going on and we'll reach out to set up an assessment. No charge to get the conversation started.
What We Can Help With
- Diagnosing why a sauna feels stuffy, weak, or uneven
- A ventilation plan — and the kit to do it
- Bench layout and sizing that fixes the heat
- Heater problems — burned-out elements, thermostats, and sizing
- Drainage, flooring, insulation, and vapor barrier fixes
- A full remote renovation plan with a materials list
Common Questions
Wipe the benches after each session and air the room out with the door open — drying matters more than scrubbing. Do a deeper clean with warm water and mild soap every month or two.
Don't seal or varnish the interior — bare wood needs to breathe. A food-safe paraffin sauna oil on the benches is optional. The exterior siding does benefit from a stain or sealer.
Restack and toss the cracked ones once a year; fully replace the set every couple of years. Broken rocks choke the heater's airflow. Use real sauna stones, not yard rocks.
Usually a burned-out heating element — when one of the heater's elements fails it still glows but can't reach temperature. Elements are replaceable without a new heater. Next suspects: a bad thermostat or sensor, an undersized heater, or a room losing heat through failed insulation or a leaky door.
Yes — almost any sauna, without rebuilding. Our Ventilation Kit is a pre-assembled intake + exhaust you install with a drill in about an hour.
Starting the conversation is free. Send photos and a description and we'll tell you what we'd do. A full renovation plan is quoted up front before any work.
Keep Reading
More on the upgrades that make the biggest difference: the Sauna Ventilation Kit, how sauna ventilation should be designed, and the most common ventilation mistakes. Planning a bigger renovation? The sauna materials calculator prices out a parts list, and the sauna reviews show what good benches, heaters, and ventilation actually look like.
Building a Sauna From Scratch?
If you're past renovating and want to start over — or you're building your first one — we offer full custom designs with 3D models, materials lists, and construction instructions, with the ventilation and benches done right from the start.
Learn About Custom Design →